Choosing a base image
Where is balenalib?
Balenalib was the home for 26,000+ IoT-focused Docker images built specifically for balenaCloud and balenaOS. Balena stopped publishing updates to balenalib in 2025, however, all of the previously published images are still available. Read our announcement blog post for more information.
Note: The docs for balenalib base images (deprecated) that used to be on this page have been moved here.
When balena started publishing these base images back in 2016, the Docker ecosystem was quite new, and support for ARM 6/7/8 images was almost non-existent. Today, however, Docker images for all architectures and software stacks are well supported and maintained. Consequently, this shift in the larger ecosystem meant that balenalib base images' value and advantage have diminished over the past few years.
Use Docker Official Images instead
We now recommend using Docker Official Images. These images hosted on Docker Hub are pre-built, vetted, and curated. They provide clear documentation, receive regular updates, and are continuously monitored for security issues.
The Docker Official Images team, with help from community contributors, formally reviews each Docker image before accepting it into the program. To identify a Docker Official Image, look for this tag below on Docker Hub for the image you are assessing.

How to Pick a Base Image
For general use cases, you can usually start with a standard Linux distribution’s Official Docker Image, and install further requirements and dependencies in your Dockerfile. For instance, here is an example of installing the Nano text editor in the official Debian image:
FROM debian:bookworm-20250407  # This is the official image

# Here we install a utility not included in the base image:

RUN apt update && apt install -y --no-install-recommends nano

CMD ["sleep", "infinity"]
Scroll past the tag list to find more helpful information in the “Overview” tab on the Docker Hub repository for these popular OS images. That information includes supported architectures, image descriptions, and the available variants and tags:
- Debian official images: https://hub.docker.com/_/debian
- Ubuntu official images: https://hub.docker.com/_/ubuntu/
- Fedora official images: https://hub.docker.com/_/fedora
- Alpine official images: https://hub.docker.com/_/alpine
Choose the right device architecture
Dockerhub uses a different naming convention for device architecture than balena. Use the table below to convert a balena specified architecture to the equivalent architecture listed on Dockerhub. To see the architecture for balena-supported devices, check out the balena Machine names and architecture page.
As an example, if you are using a Raspberry Pi Zero 2W, the balena machine name page shows the “balena_arch” as “aarch64”. In the table below, aarch64 is referred to as “arm64v8 (ARMv8 64-bit)” on Dockerhub. Look out for arm64v8 images to find images compatible with the Raspberry Pi Zero 2W device type.
| Docker Architecture | Balena Architecture (BALENA_ARCH) | Alternative Names | Example Device Types |
|---|---|---|---|
| arm32v6 (ARMv6 32-bit) | rpi | armv6, armhf (in some contexts) | Raspberry Pi 1 model B+, Raspberry Pi Zero/W |
| arm32v7 (ARMv7 32-bit) | armv7hf | armv7, armv7l, armhf | BeagleBone Black, Raspberry Pi 2 |
| arm64v8 (ARMv8 64-bit) | aarch64 | arm64, armv8 | IOT-GATE-iMX8, Raspberry Pi 4, NVIDIA Jetson |
| amd64 (Linux x86-64) | amd64 | x86_64, x64 | Intel NUC, generic x86-64 devices, cloud VMs |
| i386 (x86/i686) | i386 | x86, i686, ia32 | Older 32-bit x86 based devices |
| windows-amd64 (Windows x86-64) | Not supported | win-amd64, x86_64 (on Windows) | ? |
Tags vs. digests
When using base image tags in your Dockerfile, such as FROM ubuntu:22.04 you are specifying an image name (“ubuntu”) and tag (“22.04”). Whenever you build your container, it will pull the latest version of Ubuntu 22.04, which may change over time as new updates are added.
We recommend using a fixed (pinned) version of an image in production. Using a digest will make sure you are consistently pulling the same image for your application.
For instance, we can see the digests listed for ubuntu 22.04 in Dockerhub:
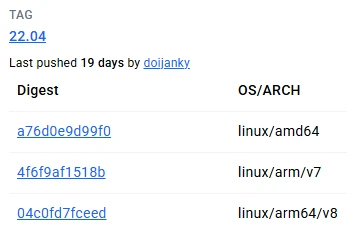
Clicking on the one for linux/arm64/v8, we can copy the full digest by clicking the link:
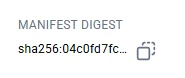
And then we can use that digest instead of the tag to always get the same version of Ubuntu 22.04:
FROM ubuntu@sha256:04c0fd7fceedf5c0fe69ec1685c37cf270f03ae424322a58548b095528f4a3c3Note that one downside to this method is that you may not receive some important security updates because your image is “pinned” to that static version. It’s a good idea to periodically test newer versions and update accordingly.
Distroless images
Official OS images still contain packages and utilities which you may not need. As you narrow in on the dependencies for your production application, you may want to consider a “distroless image”.
A distroless image is a Docker image that contains only the necessary runtime dependencies for an application, without including unnecessary utilities like package managers, shells, or other items found in a typical Linux distribution. These images can provide a minimized security attack surface, smaller deployment sizes, and faster start-up time, among other benefits.
Distroless images are typically built from scratch or based on minimal distributions like Debian or Alpine, but with all non-essential components removed. Tools such as BuildKit can assist in such builds.
Important note: Distroless images do not include a shell, so you cannot open a session into them for debugging like you can with other images. This makes them ideal for production, but more challenging for development and debugging. Distroless images also breaks the web terminal feature of the balenaCloud dashboard and CLI without any notification or error message since it requires the container to have a shell to SSH into.
Other resources for distroless images include: https://github.com/GoogleContainerTools/distroless
https://github.com/dotnet/dotnet-docker/blob/main/documentation/distroless.md
https://www.docker.com/blog/is-your-container-image-really-distroless/
Using Software Language Stacks
To utilize a software language stack such as Python or Node.js in your container, look for the Official Docker image tag and check out the overview tab to see if one of the variants fulfills your version, size and device architecture requirements. Docker Official images could increase the size of the application and we recommend testing the image thoroughly before using it in your production fleet.
Here’s a list of Docker Official images for popular programming languages:
- Python: https://hub.docker.com/_/python
- Node: https://hub.docker.com/_/node
- OpenJDK: https://hub.docker.com/_/openjdk
- .NET: https://hub.docker.com/r/microsoft/dotnet-sdk
- Rust: https://hub.docker.com/_/rust
- Go: https://hub.docker.com/_/golang
These language stacks are often built on top of only one or two different OS images such as Debian and Alpine. What if you want an image combination that the official image does not provide, such as Python on Ubuntu? In that case you can try installing packages from the OS’s package management system tool, in this case using apt to install the language version which ships with the selected distribution, for example:
FROM ubuntu:focal-20250404  #  This is the official Ubuntu image

# Update the packages and install the Python version provided
#  by Ubuntu's package manager:
RUN apt-get update && apt-get install -y --no-install-recommends python3 python3-dev

CMD [“sleep”, “infinity”]
In the above example, Ubuntu’s apt will install the default Python version set by package maintainers. The distro may have a few other versions of the software available, or you could look into adding a Personal Package Archive (PPA). If you want a specific version of Python, (or any package for that matter) you can also install the binaries from the official sources. Similarly for other OS distributions, you need to find which versions are available in the package repositories when installing a particular software, for example, Alpine Package Repository.
The instructions for installing a language stack from the official binaries is beyond the scope of this document, but many guides exist online. Here are a few examples:
- Installing Python from source: https://realpython.com/installing-python/#linux-how-to-build-python-from-source-code
- Installing Node from source: https://github.com/nodejs/node/blob/main/BUILDING.md
- Installing Golang from source: https://linuxhit.com/how-to-install-go-on-linux-using-official-binary-releases/
- Installing OpenJDK from source: https://openjdk.org/groups/build/doc/building.html And so on
Note that these instructions are not necessarily written for building a container, so you may have to adapt the steps to work in a Dockerfile. For example, if an instruction says to “download a file with wget https://dl.google.com/go/go1.13.5.linux-amd64.tar.gz” the line in the Dockerfile would be:
RUN wget https://dl.google.com/go/go1.13.5.linux-amd64.tar.gz
Installing L4T Library Stacks
For base images that will be running on NVIDIA Jetson devices, you’ll likely want to add NVIDIA’s APT sources to your Dockerfile. This will allow you to install official NVIDIA packages (such as CUDA, Jetpack, etc…) using your distribution’s package manager. The specific repository URL depends on your base image (e.g., Ubuntu, Debian) and the NVIDIA driver version you need. (More information about that here.)
FROM ubuntu:22.04

# Add NVIDIA APT repository

RUN echo "deb https://repo.download.nvidia.com/jetson/common r36.3 main" >>  /etc/apt/sources.list.d/nvidia.list \
    && echo "deb https://repo.download.nvidia.com/jetson/t234 r36.3 main" >>  /etc/apt/sources.list.d/nvidia.list \
    && apt-key adv --fetch-key http://repo.download.nvidia.com/jetson/jetson-ota-public.asc \
    && mkdir -p /opt/nvidia/l4t-packages/ && touch /opt/nvidia/l4t-packages/.nv-l4t-disable-boot-fw-update-in-preinstall


# Update package list
RUN apt-get update

# install CUDA

# Continue with your application's build instructions
Here’s an example for the legacy TX2 and earlier Jetpack versions:
FROM ubuntu:22.04

# Add NVIDIA APT repository


RUN echo "deb https://repo.download.nvidia.com/jetson/common r32.7 main" >>  /etc/apt/sources.list.d/nvidia.list \
    && echo "deb https://repo.download.nvidia.com/jetson/t186 r32.7 main" >>  /etc/apt/sources.list.d/nvidia.list \
    && apt-key adv --fetch-key http://repo.download.nvidia.com/jetson/jetson-ota-public.asc \
    && mkdir -p /opt/nvidia/l4t-packages/ && touch /opt/nvidia/l4t-packages/.nv-l4t-disable-boot-fw-update-in-preinstall

# Update package list
RUN apt-get update

# install CUDA


# Continue with your application's build instructions
More resources for working with NVIDIA Jetson devices and base images are here:
Installing your own Initsystem
We recommend the use of multiple containers rather than the use of an initsystem, particularly systemd, in the container as it tends to cause a myriad of issues, undefined behavior and requires the container to run fully privileged.
However, if your container relies on initsystem features, it is fairly easy to add this functionality to your base image. We have provided some examples for systemd and openRC. Please note that different systemd versions require different implementations so for Debian Jessie and older, please refer to this example and for Debian Stretch and later, please refer to this example.
Generally, for systemd, it just requires installing the systemd package, masking a number of services and defining a new entry.sh and a balena.service. The Dockerfile below demonstrates this:
FROM debian:bullseye-20250224

# Install Systemd
RUN apt-get update && apt-get install -y --no-install-recommends \
        systemd \
        systemd-sysv \
    && rm -rf /var/lib/apt/lists/*

ENV container docker

# We never want these to run in a container
# Feel free to edit the list but this is the one we used
RUN systemctl mask \
    dev-hugepages.mount \
    sys-fs-fuse-connections.mount \
    sys-kernel-config.mount \

    display-manager.service \
    getty@.service \
    systemd-logind.service \
    systemd-remount-fs.service \

    getty.target \
    graphical.target \
    kmod-static-nodes.service

COPY entry.sh /usr/bin/entry.sh
COPY balena.service /etc/systemd/system/balena.service

RUN systemctl enable /etc/systemd/system/balena.service

STOPSIGNAL 37
ENTRYPOINT ["/usr/bin/entry.sh"]

##################################
# Your code here...
##################################
Update balenalib base images
While we recommend migrating to Docker Official Images for new projects, we understand that existing applications may need continued support for balenalib base images. If you need to update or customize your existing balenalib base images to minimize disruption during migration, you can use the original Dockerfiles as a starting point.
All Dockerfiles for the base images publicly are available in the balena-io-library/base-images repository.
This approach allows you to:
- Maintain existing functionality while gradually migrating to official images
- Update dependencies and security patches as needed
- Customize the base image for your specific requirements
- Reduce disruption to existing deployments
Before deployment to your fleet, please test thoroughly on actual hardware before deploying to production fleets.